Showing posts with label Crafty Alley Monthly Kit Club. Show all posts

Saturday, September 18, 2010

A Couple of Cards

Hi there everyone and thanks for stopping by. Today I'd like to show you a couple of cards that I’ve made using the gorgeous items from the September Kit from Crafty Alley.

DSCF9601

DSCF9604

The DP that I’ve used are Basic Grey and this is included in the September Kit from Crafty Alley and I’ve distressed the edges using my scissors.

The pink ribbon that I’ve used on the bottom card is also in the September Kit.

Ok that’s it from me today and hope you enjoy the rest of the weekend.

Hugs Michele x

Saturday, September 4, 2010

Fairy Card

Hi there everyone and thanks for stopping by. Today I'd like to show you a card that I’ve made using the gorgeous items from the September Kit from Crafty Alley.

DSCF9554

The DP that I’ve used are Basic Grey and this is included in the September Kit from Crafty Alley and I’ve distressed the edges using my scissors.

The braided ribbon I’ve used is also in the September Kit along with the tiny holographic heart sequins.

Ok that’s it from me today and hope you enjoy the rest of the weekend.

Hugs Michele x

Monday, August 23, 2010

Some Cards From Me

Hi there everyone just a quickie from me tonight as I completely forgot to do my posting for today. I just want to show you a couple of cards that I’ve made using the gorgeous papers from the August Kit from the Crafty Alley.

DSCF9376

For this card I’ve used the large green flower, button and papers from the August Kit.

DSCF9405

On this card I’ve used the very yummy papers that is in the August Kit.

DSCF9456

And here is the last card that I want to show you using the papers from the August Kit. For the edges I’ve inked them up using clear embossing powder and then sprinkled Gold Glitter Embossing powder over it and then used my heat gun to melt it.

Hope that this has given you some ideas.

Hugs Michele x

Saturday, August 21, 2010

Wedding Layout

Hi there everyone and thanks for stopping by. Today I’d like to show you a layout that I’ve done. I was meant to show you this last Monday but wanted to keep it until today as today is a very special day for me as it would have been my lovely Mum’s 66th Birthday but very sadly she was taken from us December 2007. Today is also my 11th Wedding Anniversary so I thought what better way to celebrate the two occasions in creating a Wedding layout using a photo of my Mum & Dad’s Wedding Day (it’s kind of a little gift to my Mum)

DSCF9409

The DP are from the August Kit from the Crafty Alley and for the green papers I’ve just ripped the edges exposing the white underneath and then inked it up using Frayed Burlap.

The journaling tag is also in the August Kit from Crafty Alley.

I made the yellow roses myself as these was my Mum’s favourite flowers and I created these using my slice machine.

image

I didn’t have any of the swirl adhesive gems so I created my own using silver beads, glue and a lot of patience, LOL – But I think it turned out ok.

image The butterfly I’ve used is also in the August Kit from the Crafty Alley and I’ve glued some of the silver beads to the body.

image

As I want to be able to see this all the time, I’ve put it in a picture frame and will hang it in the hallway. I’ve still got to stain the frame itself but just wanted to show you the finished look.

I hope that this has given some ideas on how to use the elements from the August Kit.

Hugs Michele x

Monday, August 9, 2010

Nursery Door Hanger

Hi there and thanks for stopping by. Today it’s my turn to show you my project that I’ve made using materials from the August Kit from the Crafty Alley.

DSCF9344

I’ve made this hanger completely from scratch using just cereal boxes as a base, I’ve taken photos along the way of creating this project so I shall do a tutorial for you another day.

Materials used from the kit :- DP, brass button, key embellishment, butterfly and Dried Marigold Distress Crackle Paint.

Hope you like this little project and that it gives you some ideas for creations with your August kit.

Hugs Michele x

Monday, August 2, 2010

Another Couple of Cards From Me

Hi there everyone and hope you’re enjoying the long weekend. Today I’d like to show you a couple of cards that I’ve made using the gorgeous items from  the August kit from the Crafty Alley.

DSCF9288

First off I’d like to show you this card that I've made using the DP from the August Kit and I’ve gone round the edges using gold stickles.

The image is from Pollycraft and I’ve coloured her using my new AquaMarker pens from Letraset.

The metal embellishment and butterfly is also from the August Kit.

The flowers I made myself using various punches.

DSCF9304

This is another card that I’ve made using the gorgeous papers from the August Kit.

The image that I’ve used is from Whiff of Joy and I’ve coloured Willow using my new AquaMarkers from Letraset. I’ve gone round the edges of the image using Victorian Velvet Distress inks that was in a previous kit.

The strands that I’ve used on my card is also from the August kit.

The large pink flower is from a previous kit and the roses I made myself using various dies.

I hope that these cards have given you an idea of the gorgeous papers and items that are in this August Kit.

Thanks for stopping by today.

Hugs Michele x

Monday, July 26, 2010

A Couple of Cards And a Sneaky Peak

Hi there everyone and hope you had a lovely weekend. Today I’d like to show you a couple of cards that I’ve made using the gorgeous DP from  the July kit and also a sneak peak into the August kit.

DSCF9241

For this card I’ve used the adorable ‘Fairy Tallulah’ from Digi Stamp Boutique and I’ve coloured her using my ProMarker pens.

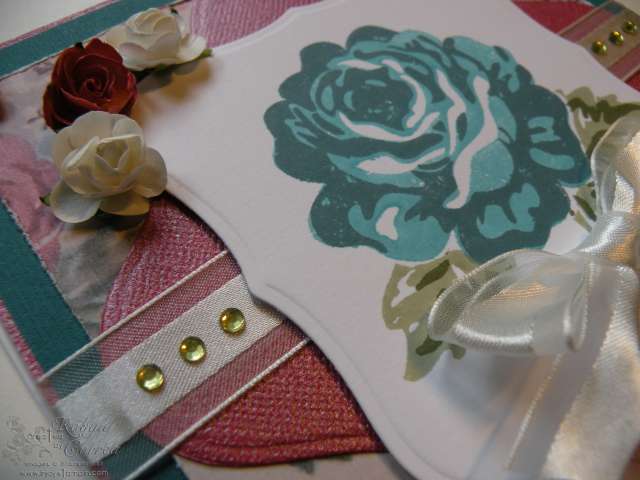
The DP is from the July kit along with the self-adhesive yellow gems.

The flowers I made myself using various dies.

DSCF9275

For this card I’ve used one of the gorgeous Crystal Fairy images from Pollycraft and again I’ve coloured her using my ProMarker pens. I’ve inked the edges up using Frayed Burlap Distress Inks from the Crafty Alley.

The DP is from the new August Kit which will be available very soon.

The flowers I made myself using various dies.

image

I also just want to show the gorgeous embellishments that is included in the August kit

image

Along with 9 Maya Road Kraft Journaling Tags and then there is also 50 12x12 K&Company Classic Paper Collection (which everyone I love)

Because there’s so much in the August kit, there’s a limited amount, so once they’re gone you won’t be able to get your hands on it. So you’d better be quick to avoid a disappointment.

Ok well that’s it from me today and I hope that you’ve enjoyed a sneak peak into the August kit.

Hugs Michele x

Monday, July 19, 2010

A Couple of Cards

Hi there everyone and hope you’re enjoying the gorgeous July kit. Today I’d like to show you a couple of cards that I’ve made using the very yummy DP and embellies from the July kit

DSCF9236

The image I’ve used is one of the Crystal Fairy digital images from Pollycraft and I’ve used my ProMarkers to colour her in.

The sketch I’ve followed from Friday Sketchers.

The lace ribbon is from the July kit

The flowers I made myself using my slice machine and the raffia and feather are from my stash.

DSCF9140

And here’s another card that I’ve made using the gorgeous DP from the July kit.

The image that I’ve used is the adorable Willow from Whiff of Joy and I’ve coloured her using my ProMarker pens. I’ve inked up the edges using Blue Faded Jeans distress inks from Crafty Alley and also used a swirl stamp.

The flowers I made myself using various dies.

Ok that’s it from me for now and don’t forget to pop back again tomorrow to see what gorgeous creations the other DT has for you.

Hugs Michele x

Saturday, July 17, 2010

Altered Children's Book

Hi there everyone and thanks for stopping by. Today I’d like to show you a little project that I’ve made using a hard-backed children’s book. I’ve got so many of these books that my children don’t look at anymore, so I thought that I’d put them to good use. So I decided to make a mini-album for the very first time. A friend of mine is getting married in a few weeks time so I thought that I would make a wedding mini-album for her as a little gift.

DSCF9220

DSCF9221

DSCF9225

DSCF9223

DSCF9228

DSCF9230

DSCF9233

DSCF9235

I’ve really enjoyed putting this mini-album together and this will definitely won’t be the last

Almost all the materials I’ve used are from the July kit from Crafty Alley and also previous kits, except for the flowers which I made myself.

Hope you all like this mini-album.

Hugs Michele x

Friday, July 16, 2010

Vintage Butterfly...or is it?


Happy Friday Ladies! I can't believe how fast this week has flown by! I have a card to share with you today that is using DP from the lovely July kit from the Crafty Alley shop. I've really grunged it up and distressed it quite a lot.


I've created the butterfly using the Cracked Glass technique.


First I stamped the flower onto watercolour paper using StazOn ink. I then colored it in using my AquaPainter and Stampin' Up! ink pads. I spritzed it with a brown marker and then die cut the butterfly shape with my Big Shot. After inking up the edges of the butterfly, I added VersaMark ink to the entire surface. I heat embossed it a total of 3 times using UTEE (Ultra Thick Embossing Enamel by Ranger). Then all you do is pop it into the freezer for about 15 minutes to harden it up further, and when you take it out you simply bend and snap the UTEE. Voilà! You've done the Cracked Glass technique. To further emphasize the cracks, I like to rub ink over the surface so it gets down into the cracks.


I hope you give it a go, it is a lot of fun. Thanks for stopping by today, I hope you all have a lovely weekend.
Robyn xx

Monday, July 5, 2010

Magnolia Easel Card

Hi there and thanks for stopping by. Today I'd like to show you a card that I've made using the gorgeous papers and embellishments from the July kit from Crafty Alley.

DSCF9077

This is one of the cards that I made for the card making class which I held at the Crafty Alley shop last Saturday.

All of the items that I've used on this card is from the July kit.

DSCF9081

Here's another close-up of the image that I've used along with some of the embellishments that is in the July kit.

I hope that this has given you a little inspiration.

Hugs Michele x

Wednesday, June 30, 2010

Challenge 3

Welcome along to another Crafty Alley challenge and for this month it's my turn (Michele Roos) to set the challenge. We loved looking at your gorgeous creations and thanks to everyone to who joined in.

Onto our next challenge and this time we have a sketch designed by myself.

TS SKETCH 2

And here is my card that I've made to give you a little inspiration

DSCF8813

All the items that I've used on my card is from the June Kit from Crafty Alley, apart from the image and the flowers.

This challenge will run for the month of June and then we will the pick a winner using Random.Org and that lucky someone will win a fab prize sponsored by The Crafty Alley! If we get more than 100 followers before the challenge ends, I will throw in some extra candy myself. So help spread the word about the Crafty Alley Challenge.

Now it's your turn!! We can't wait to see your cards/projects based on the above sketch
Link your card below for your chance to win. If you don't have a blog, you can upload your card to the Crafty Alley Ning group.

Happy Crafting!!

Please note that this post is a sticky and will stay at the top for the month of June. More recent posts will be below this one.

Friday, June 4, 2010

Super Dad

Hi and thanks for stopping by. Today I'd like to show you a card that I've made using the gorgeous DP from the June Kit.

DSCF8821

Materials used:-

DP: June Kit

Tim Holtz Journal Ticket: June Kit

Enjoy Sentiment: May Kit

Large Red Brads: April Kit

Everything else is from my stash.

Ok that's it for me and I hope you enjoy you're weekend.

Hugs Michele x

Thursday, June 3, 2010

Summer Fun Card

Hi there and thanks for stopping by. Today I'd like to show you a card using the gorgeous papers and embellishments from the June kit.


DSCF8809

All the items used on this card are from the June Kit, apart from the image, star shape and poppers.

image

Here's a close-up of the metal corners that is in the June kit.

image

And here's a close-up of one of the metal sentiments that is in the kit.

DSCF8826

Here's another close-up of the metal Tim Holtz Idea-Ology embellishments that comes in the June Kit.

Hope you enjoy the rest of your day.

Hugs Michele x

Friday, May 28, 2010

This has been a great kit!


Hi Ladies, I can hardly believe that it's time to close out another kit month! Where has the time gone?! Have you enjoyed seeing all of the DT projects as much as I have? So many great ideas to inspire.

Thank you Cathy for creating such a great kit for all of us to work/play with. Can't wait for the June kit, I'm sure everyone will just LOVE it!

The supplies used from the Crafty Alley May kit were:

Bazzil cardstock
Vintage Findings patterned paper
Vintage Findings Ephemera die cuts
Vintage Findings paper ribbon
Cotton ribbon trim (1 was Glimmer Misted)
Card base and envelope


Thursday, May 27, 2010

May Vintage Findings Kit

Hi there and thanks for stopping by. Today I'd like to show you some cards that I've made using the gorgeous DP from the May Vintage Findings Kit.

DSCF8654

DSCF8789

DSCF8794

Supplies used:-

Bazzil cardstock

Bazzil Bling Cardstock

Vintage Findings patterned paper

Distress Stickles

Hope you like the cards that I've created and has given you a little inspiration.

Enjoy the rest of your week.

Hugs Michele x

Friday, May 21, 2010

A Rose is a Rose


Hi Everyone,
Thanks so much for stopping by today. Here is a card made using the May kit from Crafty Alley. Hope you like it.

Supplies from the kit used were:

Bazzil cardstock
Bazzil Bling Cardstock
Vintage Findings patterned paper
Gems

Hope you have a great week!

Crafty Hugs,
Robyn xx


Thursday, May 20, 2010

Chipboard Clipboard Tutorial

Hi there and thanks for stopping by. Today I'd like to show you how I've made this cute little clipboard using items from the May Vintage Findings Kit.

1 x Scalloped Chipboard piece

1 x DP 12.5cm x 9.5cm

1 x DP 12cm x 9cm

1 x DP 8.5cm x 7cm

1 x DP 8cm x 6.5cm

Distress Stickles

Distress Ink

Gems

First of all ink all the edges of the Scalloped Chipboard piece using distress ink. For my project I've used Frayed Burlap.

Next ink all the edges of the DP again using Distress Inks. For the next step I've added Distress Stickles to the edges of the Scalloped Chipboard piece along with the DP.

Next I've used MME Bloom & Grow clear stamps set from Crafty Alley and stamped the images using Frayed Burlap Distress Inks. I've then applied double-sided tape to the underneath and stuck the papers down in the above layout.

And here is the end result after applying a cute little image and some flowers along with the Tim Holtz Idea-ology Hinge Clips and Swivel Clasps

I hope that this tutorial has given you some ideas.

Hugs Michele x